

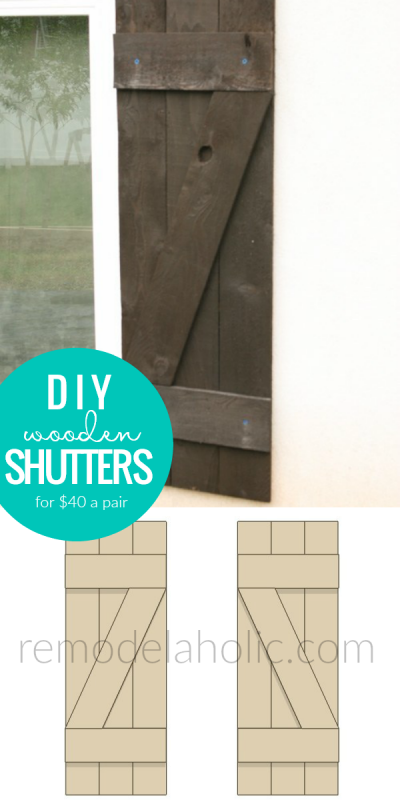
How To Make Your Own Exterior Window Shutters

One time we had our old windows replaced, we idea that we needed to apparel them up a little bit more, on the outside. We decided that they actually needed forest shutters. We priced out what it would cost to by new shutters and found out that information technology was going to be over $100 to $300 a pair. That was way too much coin for united states (and I am assuming you experience the same way?, am I right?). Then, we started designing instead, to come up with a cheaper alternative.
The design that nosotros came up with, is actually called "cottage style board-n-batten wood shutters with a Z bar". Nosotros decided that we could build a pair of wood shutters for under $forty. That was more like it! A lot cheaper than the alternative of ownership shutters.

DIY Wood Shutters

Hither is how they turned out.

We take had many requests to make a tutorial on how we congenital our woods shutters, then here information technology is.
Prefer to buy instead of build? Meet our picks for best exterior shutters.
Build Your Own DIY Wood Shutters Tutorial
DIY Wood Shutters Notes
- These are instructions for 1 wood shutter only, one side of the window. Adjust your fabric quantities for the number of shutters that y'all need.
- Screw the boards together through the back, in order the hide all the screw heads from view. Be sure the buy screws that are less than the thickness of the material screwed together and weather resistant then they don't go out ugly rust stains on your wood.
This postal service contains affiliate links. Learn more and read our full disclosure policy here.
Tools Used
- Miter Saw or Circular Saw
- Drill
- Hammer Drill – For installing on brick or physical surfaces.
- Saw horses (optional)
Material Used (enough material for two shutters effectually one window)
- (12) 6′ Cedar Fence Planks – About $2.50 each. This volition requite you a couple actress just in case!

- (1) Box of 1″ Exterior Wood Screws – About $10 per box. I used near 30 per shutter. One box tin can practise about iii-4 shutters.
- (4) 3 3/4″ Concrete Screws – (simply if you are attaching to physical, in our case we were)
- (1) Quart of Stain – We used Varathane Woods Stain – Kona Color. This will cover 2-4 shutters.
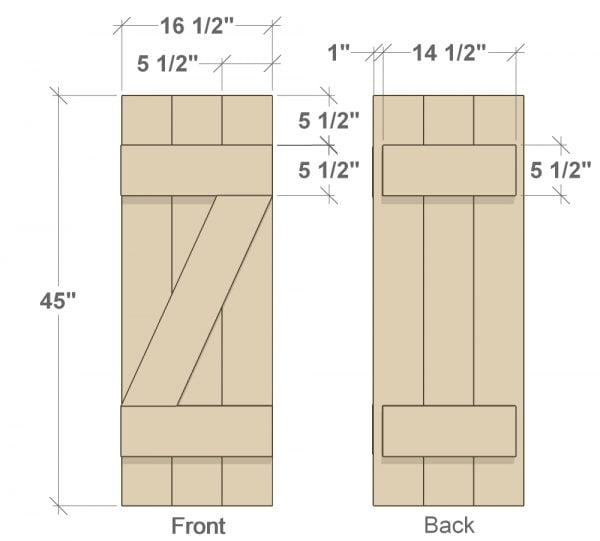
Cut Canvas for 45″ Shutter(length x width 10 thickness)
- (3) Boards – 45″ x 5 1/2″ ten 1/2″
- (2) Front battens – xvi one/2″ x v 1/two″ x one/2″
- (ii) Back battens – xiv i/ii″ x 5 ane/two″ x 1/two″
- (1) Z bar – 27 3/four″ 10 5 1/2″ x 1/two″
Structure Steps


This is how I spaced the battens. I used a scrap piece of cedar plank which was 5 1/2″ wide to offset it from the top and lesser.


To adjust the Z bar for a unlike elevation shutter: Identify a board beyond the battens diagonally, matching upwardly the outside corners. Utilise a carpenter's square or L square to draw a straight horizontal line at the batten position. Then cut forth that line using a miter saw, tabular array saw, or circular saw.
Utilize clamps to agree everything together when you have the pieces in identify. So flip over the wood shutters and screw them together. This way you don't encounter the screw heads on the front side. Just make sure that the screws are brusque enough not to poke through.
Employ exterior forest screws and so they won't rust.
Now, in stride five, you tin can spiral on the dorsum battens to get-go the shutters from the wall slightly.
When nosotros made a set of these wood shutters, we idea that it looked best to have the correct side a mirrored image of the left, only like yous see beneath.

Staining and Installing the Wood Shutters
We wanted to brand sure we liked which way the z bar was oriented, so nosotros did a couple of test shots.


Now it was time to utilise the stain. We picked a dark chocolate colour stain called, Kona.

Merely apply with a foam brush and wipe off with a clean rag. The cedar wood soaks up a lot of stain, so plan on using a trivial more than one pint per shutter.

All prepare for install now.
Installing Exterior Wood Shutters
Ours are installed on the concrete foundation walls, so I needed a hammer drill to drill holes for the concrete screws.

Employ a block on the bottom to set up the shutter to the right superlative, when installing. This is great if you don't have another hand to help hold it up.

I used (iv) 3 3/4″ physical screws to concord the forest shutters to the wall. Because the screws were blue, I took a cotton swab and practical a piffling bit of stain to cover-up the blue screw heads, worked similar a charm!

Here is what the original window looked like, before being replaced.

Here is the new window installed.

And hither is the new window installed with wood shutters. I retrieve information technology looks so much better, don't you lot?
See more of the projects we did in this Coulee House m here.

Click here to get a printable version of these instructions.
More like shooting fish in a barrel ways to improve your curb entreatment:
- Outside Paint Colors that Add Curb Appeal
- Beautiful Forepart Door Paint Colors
- 25 DIY Curb Entreatment Ideas
Please pin this to share and save for later!

Source: https://www.remodelaholic.com/build-wood-shutters/
Posted by: diemerarrom1996.blogspot.com
0 Response to "How To Make Your Own Exterior Window Shutters"
Post a Comment